 Save to Pinterest
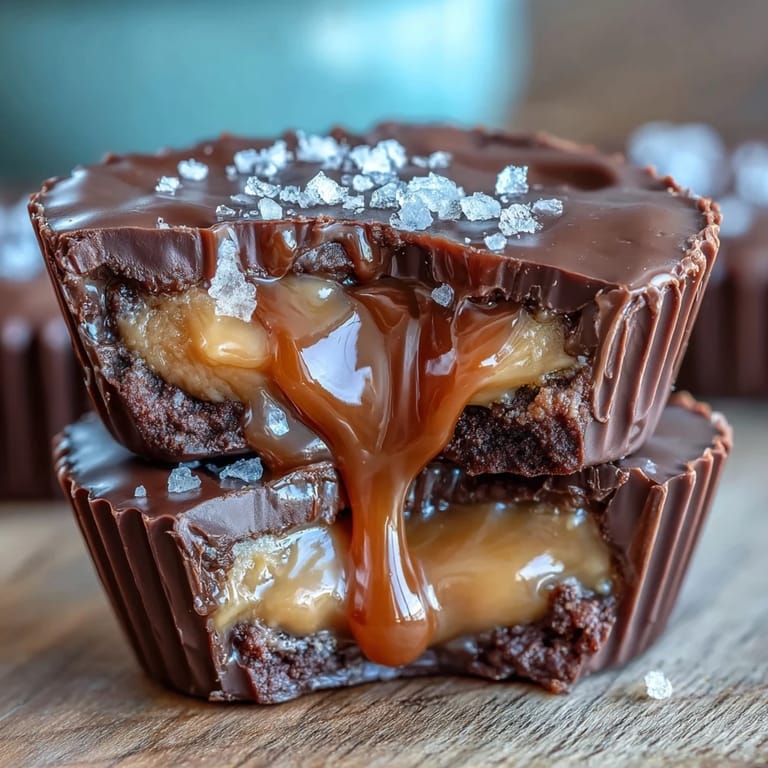
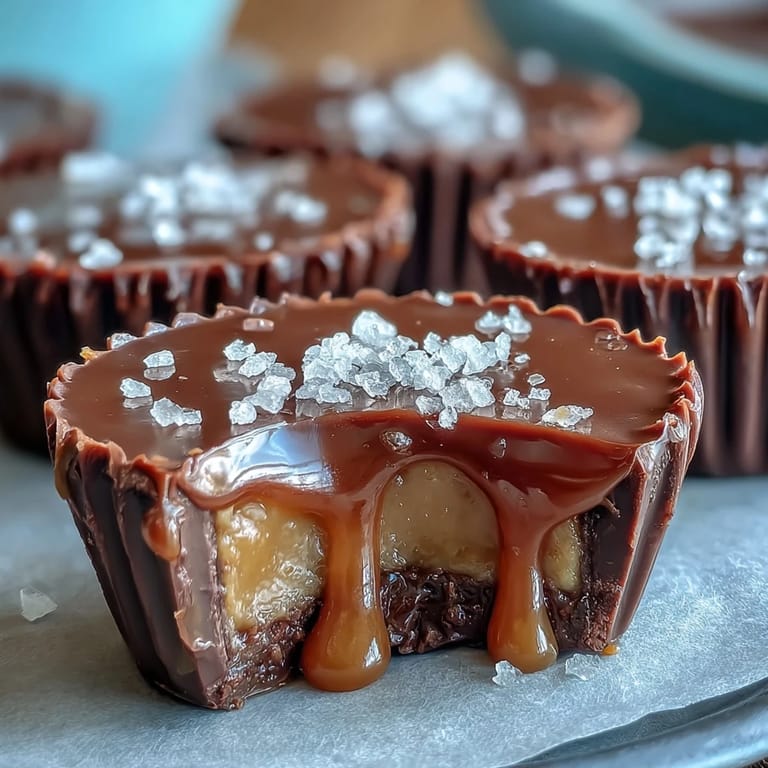
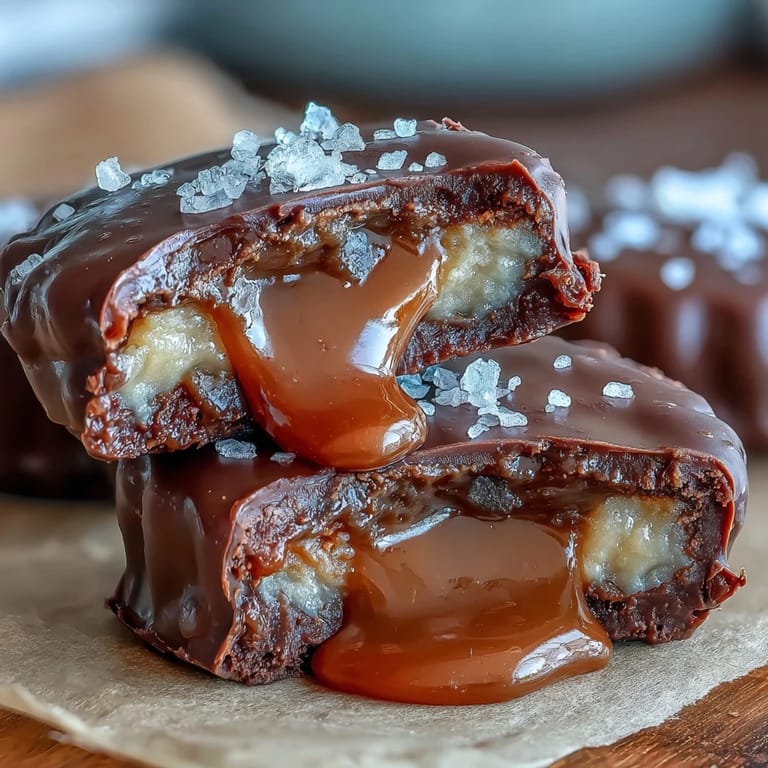
 My friend Sarah handed me one of these at a dinner party, and I watched her face light up as I bit through the crackling chocolate shell into that gooey salted caramel center. She'd been testing recipes for weeks, and this was the one that finally made everyone at the table go quiet for a moment. That's when I knew I had to learn how to make them myself, because honestly, store-bought peanut butter cups suddenly felt boring by comparison.
I made a batch for my mom's book club and caught her sneaking a second cup before anyone else had finished their first. She kept saying, "This tastes like something from a fancy chocolatier," which felt like the highest compliment coming from someone who's tasted everything. That moment made me realize homemade candy isn't just about the flavor—it's about the small victory of nailing something that feels restaurant-quality in your own kitchen.
Ingredients
- Semisweet or milk chocolate, 300 g: Semisweet gives you that classic candy bar richness, but milk chocolate works beautifully if you prefer something sweeter and smoother.
- Coconut oil or unsalted butter, 2 tbsp: This thins the chocolate just enough to coat the muffin cups evenly without making it greasy—coconut oil is my preference because it sets up crispier.
- Creamy peanut butter, 120 g: Don't use natural peanut butter here, because the extra oil will make your filling weep; stick with the kind that's been processed smooth and holds its shape.
- Powdered sugar, 2 tbsp: This sweetens the peanut butter filling and helps it stay firm while you layer everything together.
- Unsalted butter for filling, 1 tbsp: Softened butter makes the filling pillowy and adds richness that peanut butter alone can't quite deliver.
- Vanilla extract, ½ tsp: Just enough to add depth without tasting like extract—it bridges the gap between peanut and caramel beautifully.
- Granulated sugar for caramel, 100 g: Medium to high heat is your friend here; watch it turn amber without stirring, and you'll get that toasty flavor that makes people ask what your secret is.
- Unsalted butter for caramel, 2 tbsp: Add this after the sugar melts so it doesn't crystallize the sugar prematurely.
- Heavy cream, 60 ml: Cold cream poured into hot caramel will bubble dramatically—it's supposed to, so don't panic and just keep whisking.
- Fine sea salt for caramel, ¼ tsp: This dissolves into the caramel and intensifies the flavor without leaving visible grains.
- Flaky sea salt for topping: This is where you taste the salt with every bite, so use the good stuff—Maldon is worth it.
Tired of Takeout? 🥡
Get 10 meals you can make faster than delivery arrives. Seriously.
One email. No spam. Unsubscribe anytime.
Instructions
- Set up your canvas:
- Line your muffin tin with paper liners so they sit snug and won't fold over when you're spooning chocolate into them. This step feels fussy but it's what separates homemade candy from a messy situation.
- Melt the chocolate gently:
- Use a double boiler method if you have the patience, or microwave in 30-second bursts, stirring between each one so you don't end up with seized chocolate and regret. The coconut oil or butter helps it flow like silk rather than sludge.
- Build the chocolate base:
- Spoon about a tablespoon of melted chocolate into each liner, then tilt and rotate the tin so it coats the bottom and sides evenly. Pop it in the freezer for 10 minutes and you've got your foundation.
- Mix the peanut butter filling:
- Combine the creamy peanut butter, powdered sugar, softened butter, and vanilla in a bowl and stir until it's completely smooth—no lumps means every bite tastes consistent. Divide it into 12 equal portions and flatten each one into a disc that fits inside your chocolate cup.
- Make the caramel magic:
- Pour granulated sugar into a saucepan over medium heat and don't stir it, just let it sit and swirl the pan occasionally until it turns a deep golden amber—this takes about 5 minutes and smells incredible. Add butter and let it melt, then slowly pour in the cold cream while whisking constantly because it will hiss and bubble and that's exactly right.
- Season and cool:
- Whisk in the fine sea salt, then let the caramel sit for 10 minutes so it thickens just enough to stay on top of the peanut butter without sliding off into a puddle. You want it pourable but not runny.
- Layer everything together:
- Place a peanut butter disc onto each chilled chocolate base, then add about a teaspoon of cooled caramel on top—don't overfill or it'll ooze out the sides when you seal it. This is where precision feels good.
- Seal the deal:
- Spoon the remaining melted chocolate over each cup, smoothing the tops so they look intentional and pretty. The chocolate will cover the caramel and peanut butter completely, holding everything in place.
- Finish with flair:
- While the chocolate is still soft, sprinkle a tiny pinch of flaky sea salt on top of each one—just enough so you taste it but not so much that it tastes like the ocean.
- Final chill:
- Refrigerate for at least 30 minutes until everything sets completely and the chocolate snaps cleanly when you bite into it. Patience here is the difference between gooey disappointment and candy shop perfection.
 Save to Pinterest
 I gave a box of these to my neighbor who'd been dealing with a rough month, and she texted me back that they made her afternoon feel a little less heavy. That's the moment I stopped thinking of them as just a dessert and started thinking of them as small edible gifts wrapped in paper liners.
The Science of the Layers
There's something satisfying about understanding why each layer matters: the bottom chocolate layer prevents the peanut butter from soaking into your hands, the filling gives you protein and substance so the candy doesn't feel empty, and the caramel is the plot twist that makes people say "wow" out loud. The reason commercial peanut butter cups taste waxy is because they're made with cheaper chocolate and minimal caramel—your homemade version wins because you can use better ingredients and actual restraint in the amounts.
Storage and Longevity
Keep these in an airtight container in the refrigerator and they'll stay perfect for about a week, though honestly they never last that long in my house. The cold keeps the chocolate firm and the caramel gooey, which is the whole texture game here.
Variations and Flexibility
I've experimented with swapping ingredients and found that almond butter works beautifully if you need to avoid peanuts, and a tiny pinch of cinnamon in the caramel adds warmth without being obvious. The base recipe is forgiving enough that you can play with it without ruining the whole batch.
- Sunflower seed butter makes these completely nut-free and tastes surprisingly close to the original.
- Try adding ¼ teaspoon of cinnamon to the caramel if you want a subtle spiced depth that plays against the salt.
- If dark chocolate is your thing, use 70% cocoa solids for a sophisticated bitter note that balances the sweet caramel.
 Save to Pinterest
 These homemade peanut butter cups have a way of making you feel like a real candy maker, which is one of the most underrated kitchen feelings. Once you've made them once, you'll wonder why you ever settled for store-bought.
Questions & Answers
- → Can I use almond butter instead of peanut butter?
Yes, almond butter or sunflower seed butter can be substituted to make a nut-free alternative, offering a similar creamy texture.
- → How do I properly melt the chocolate?
Melt chocolate and fat gently over simmering water or in short microwave bursts, stirring frequently to avoid burning and ensure smoothness.
- → What is the role of sea salt in these cups?
Flaky sea salt enhances the sweet flavors by adding a subtle salty crunch, balancing the caramel and chocolate layers perfectly.
- → How long should the cups chill before serving?
Chilling for at least 30 minutes allows the chocolate and fillings to set firmly, making them easier to handle and enjoy.
- → Can I add cinnamon to the caramel?
Adding a pinch of cinnamon to the caramel introduces a warm spice note, complementing the sweetness elegantly.