 Save to Pinterest
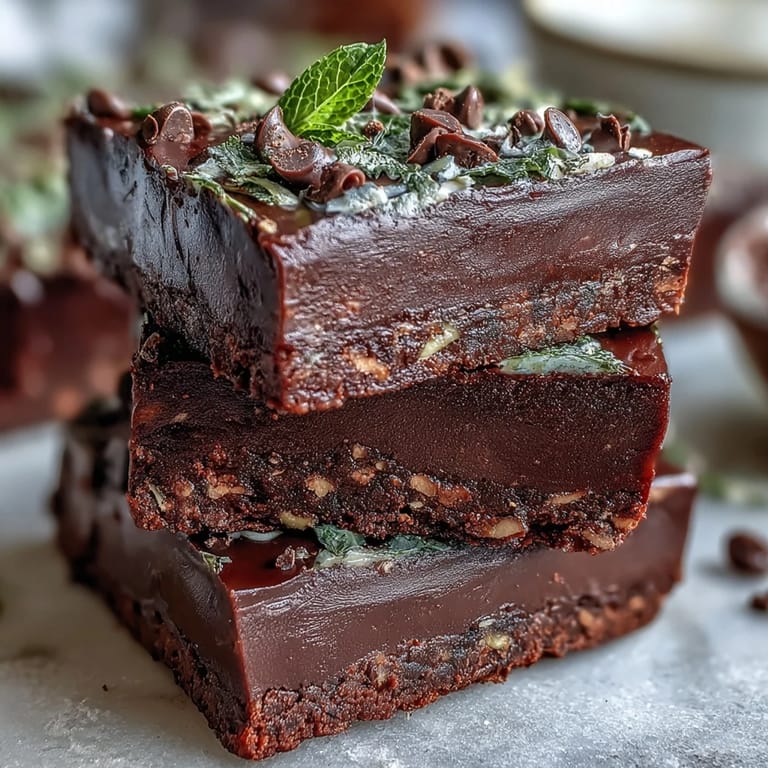
 My coworker Sarah brought these to the office three days before St. Patrick's Day, and I watched grown adults actually fight over the last one. She'd made them on a whim, thinking the green flecks would be festive, but what sold everyone was that first bite—fudgy brownie meeting cool mint meeting dark chocolate all at once. Now every March, someone asks if I'm making them, and I realized these tiny bites had somehow become our unofficial holiday tradition.
I made a batch last spring for my neighbor's book club, mostly because I'd bought peppermint extract on impulse and needed to use it. When she texted me the next day saying half her group asked for the recipe, I realized something simple could actually impress people. That's when I started experimenting—tweaking the mint level, trying different mix-ins, seeing how far I could push the flavors without losing that fudgy center everyone loves.
Ingredients
- All-purpose flour: The backbone that keeps these from being too cakey or too dense; measure it right and you'll get that tender crumb every time.
- Unsweetened cocoa powder: Don't skip the unsweetened version—it gives you control over sweetness and lets the mint shine without competing flavors.
- Baking powder: Just enough to give them a gentle lift without making them cakey or airy.
- Salt: A pinch that sounds small but brings out the chocolate and balances the mint's coolness.
- Unsalted butter: Melted slightly cooled lets you skip extra dishes and combines smoothly with sugar without breaking.
- Granulated sugar: Creates that fudgy texture when mixed with eggs and cocoa; this is where the chewiness comes from.
- Eggs at room temperature: They blend in smoother and create a better crumb structure than cold eggs.
- Vanilla extract: Deepens the chocolate notes without announcing itself.
- Peppermint extract: The star of the show—start with 1/2 teaspoon and taste the batter before baking if you're nervous about too much mint.
- Green food coloring: Optional but makes them instantly festive and catches people's eyes before they even taste them.
- Mini chocolate chips: Their small size means every bite gets chocolate distribution, and they don't sink to the bottom like regular chips do.
- Chopped Andes mints or mint chocolate pieces: These give you little pockets of concentrated mint flavor and texture variation.
Tired of Takeout? 🥡
Get 10 meals you can make faster than delivery arrives. Seriously.
One email. No spam. Unsubscribe anytime.
Instructions
- Set up your oven and tin:
- Preheat to 350°F and grease your mini muffin tin or slip liners in—this takes two minutes and saves you from frustrated prying later.
- Combine your dry base:
- Whisk flour, cocoa powder, baking powder, and salt in a medium bowl until no cocoa lumps remain; you're building the structure that holds everything together.
- Create your wet mixture:
- Whisk melted butter and sugar until they look sandy and combined, then add eggs and extracts one at a time, stirring until smooth and pale. This step takes patience but creates the emulsion that makes them fudgy.
- Add green color if you're going festive:
- Just 2 to 3 drops of food coloring swirled in gives you that St. Patrick's Day vibe without turning everything gray-green.
- Fold wet and dry together gently:
- Pour dry into wet and fold until the flour disappears—don't overmix or you'll toughen the final crumb. A few streaks of flour are fine.
- Stir in your chocolate and mint pieces:
- This is where the magic happens; the chips distribute throughout and the Andes pieces add those surprise moments of concentrated flavor.
- Fill and top:
- Spoon batter into cups about 3/4 full, then crown each one with an extra chocolate chip or two so they look intentional and delicious.
- Bake until just done:
- Thirteen to fifteen minutes—the toothpick should come out mostly clean but with a few moist crumbs clinging to it. This is crucial for fudginess.
- Cool with patience:
- Five minutes in the tin, then transfer to a wire rack so the bottoms don't steam and get soggy.
 Save to Pinterest
 My kid once took a whole container of these to school for a potluck, and his teacher called to ask for the recipe because the entire class wanted more. In that moment, I understood why people obsess over recipes—it's not just about food, it's about creating something small that makes someone's day feel a little greener and sweeter.
The Mint Question Everyone Asks
Half the time someone will taste these and say they didn't expect the mint to be so present, and that's exactly the point. The peppermint extract isn't meant to taste like a candy cane—it's supposed to be a cool undertone that makes the chocolate richer somehow, like eating dark chocolate after brushing your teeth. If you find 1/2 teaspoon too strong, dial it back to 1/4 teaspoon, taste your batter, and adjust from there; peppermint extract is potent and personal.
Troubleshooting Your Batch
Cake-like instead of fudgy? You probably baked them too long or your oven runs hot; start checking at 12 minutes next time. Mint flavor disappeared? Old extract strikes again, and it happens to the best of us. Chocolate chips sank to the bottom? Toss them in a tiny bit of flour before folding them in so they stay suspended throughout the batter.
Storage and Make-Ahead Magic
These keep in an airtight container for up to five days, which means you can make them two days before your gathering and actually enjoy yourself. They're also brilliant for freezing—wrap them individually in plastic wrap, stack in a freezer bag, and thaw at room temperature before serving. This is the secret weapon when you need dessert faster than you have time to bake.
- Let them cool completely before storing or they'll sweat and stick together.
- If you're making them ahead, wait to add the green food coloring until the day of if you're worried about color fading.
- Frozen brownie bites thaw in about 30 minutes, making them perfect for last-minute party planning.
 Save to Pinterest
 These brownie bites have a way of turning an ordinary afternoon into something worth remembering. Make a batch and watch what happens.
Questions & Answers
- → What type of chocolate works best for these bites?
Mini chocolate chips melt nicely during baking and retain a pleasant texture. You can also use chopped Andes mints for an added minty burst.
- → Can I adjust the mint flavor intensity?
Yes, increasing the peppermint extract slightly will strengthen the mint flavor, but be careful not to overpower the chocolate base.
- → What is the best way to bake these brownie bites evenly?
Filling mini muffin cups about three-quarters full ensures even baking. Bake at 350°F for 13–15 minutes and check doneness with a toothpick.
- → How should I store these bites to maintain freshness?
Store them in an airtight container at room temperature for up to five days to keep them moist and flavorful.
- → Are there any tips for making the bites festive?
Adding a few drops of green food coloring creates a celebratory look, perfect for occasions like St. Patrick's Day.