 Save to Pinterest
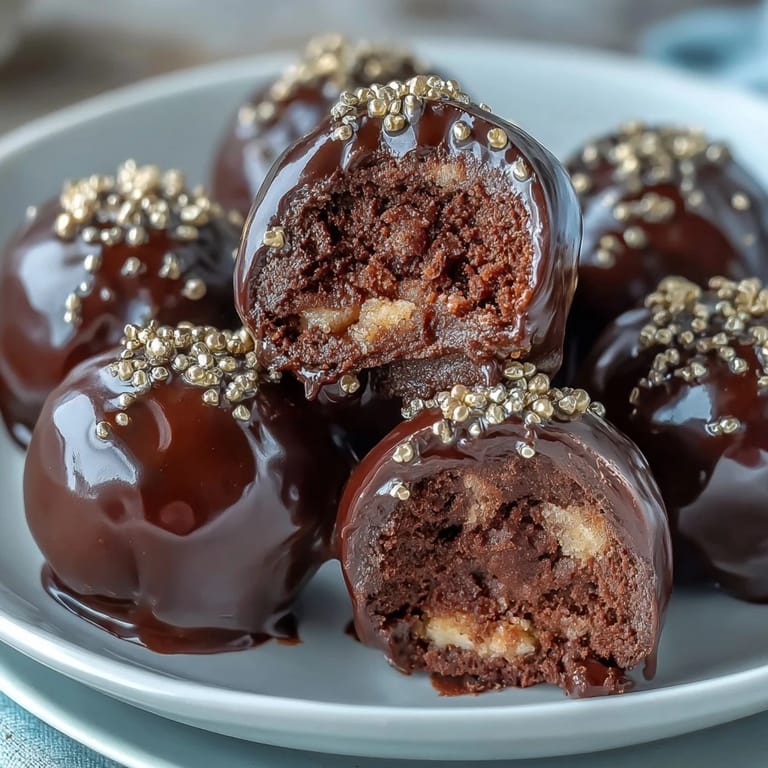
 There's something undeniably magical about St. Patrick's Day treats, and these Pot of Gold Cake Pops bring that whimsy to life in the most delicious way. Imagine rich chocolate cake pops transformed into miniature black pots, their tops gleaming with edible gold coins that sparkle under the light. These aren't just desserts—they're conversation starters, party centerpieces, and little bites of pure joy. Whether you're celebrating Irish heritage or simply looking for a festive treat that's as fun to make as it is to eat, these cake pops deliver on every level. The combination of moist chocolate cake, creamy frosting, and a glossy candy shell creates a texture that's simply irresistible, while the golden decoration adds that perfect touch of celebration.
Save to Pinterest The beauty of cake pops lies in their versatility and the joy they bring to any occasion. These Pot of Gold versions are particularly special because they capture the playful spirit of St. Patrick's Day while remaining accessible to bakers of all skill levels. Starting with a simple chocolate cake mix means you can focus on the fun part—shaping, decorating, and transforming ordinary ingredients into extraordinary treats. The process of crumbling cake, mixing it with frosting, and rolling it into balls is surprisingly therapeutic, and the final step of decorating with shimmering gold creates that wow factor that makes these pops truly memorable.
Ingredients
Tired of Takeout? 🥡
Get 10 meals you can make faster than delivery arrives. Seriously.
One email. No spam. Unsubscribe anytime.
- Cake: 1 box (400 g) chocolate cake mix (plus eggs, oil, and water as required by package)
- Frosting: 120 g (½ cup) chocolate frosting (store-bought or homemade)
- Decoration: 400 g (14 oz) black candy melts
- 48 g (2 oz) gold sprinkles or edible gold pearls
- 24 lollipop sticks
- 50 g (1.75 oz) white candy melts (optional, for accents)
- Optional: Green fondant or sprinkles for shamrocks
Instructions
- Step 1
- Preheat oven and prepare the chocolate cake according to package instructions. Bake, then allow to cool completely.
- Step 2
- Crumble the cooled cake into fine crumbs in a large bowl.
- Step 3
- Add chocolate frosting to the crumbs and mix until a dough-like consistency forms.
- Step 4
- Scoop and roll the mixture into 24 balls (about 1.5 inches in diameter). Flatten the tops slightly to mimic a pot shape.
- Step 5
- Place balls on a parchment-lined tray and refrigerate for 30 minutes.
- Step 6
- Melt black candy melts according to package instructions.
- Step 7
- Dip the tip of each lollipop stick into the melted candy, then insert it halfway into each cake ball.
- Step 8
- Chill for 10 minutes to set the sticks.
- Step 9
- Dip each cake pop fully into melted black candy melts, letting excess drip off. Stand upright in a styrofoam block or cake pop stand.
- Step 10
- Before the coating sets, immediately decorate the tops with gold sprinkles to resemble coins.
- Step 11
- For extra detail, pipe a rim around the top of each pot with additional melted black or white candy melts.
- Step 12
- Add green fondant or sprinkles for shamrock accents, if desired.
- Step 13
- Let cake pops set completely before serving.
Zusatztipps für die Zubereitung
Success with cake pops comes down to a few key techniques. First, ensure your cake is completely cooled before crumbling—warm cake will create a mushy mixture. When mixing the frosting with the crumbs, add it gradually and stop as soon as the mixture holds together; too much frosting will make the pops too soft. The refrigeration steps are crucial—they prevent the cake balls from falling off the sticks during dipping. When melting candy melts, use short bursts in the microwave and stir frequently to avoid overheating. Work quickly when decorating with gold sprinkles, as the coating sets fast. If the candy melts become too thick, add a teaspoon of vegetable oil to thin them out. For the cleanest finish, tap the stick gently after dipping to remove excess coating, then give it a slight twist as you pull it up.
Varianten und Anpassungen
These cake pops are wonderfully adaptable to different dietary needs and preferences. For a gluten-free version, simply substitute the chocolate cake mix with your favorite gluten-free variety and verify all decorations are certified gluten-free. You can switch up the cake flavor—vanilla, red velvet, or even mint chocolate would all work beautifully. Instead of black candy melts, try dark green for a more traditional Irish theme, or use brown to create a more realistic pot appearance. The gold decoration can be varied with different types of edible gold, from dust to larger pearls, or even gold-wrapped chocolate coins pressed into the top. Add a rainbow effect by creating a small fondant rainbow emerging from each pot, or incorporate orange and green candy melt drizzles for extra festive color.
Serviervorschläge
These Pot of Gold Cake Pops shine as the centerpiece of any St. Patrick's Day celebration. Display them upright in a decorative container filled with green tissue paper or shredded paper grass for a stunning presentation. Arrange them on a tiered cake stand alongside other Irish-themed treats like shamrock cookies or green cupcakes. For an adult gathering, pair them with Irish coffee, whiskey hot chocolate, or a creamy Baileys milkshake. Kids will love them served with green milk or mint hot chocolate. Create a dessert board by surrounding the cake pops with gold-wrapped chocolates, green candies, and rainbow sprinkles. They also make wonderful party favors—wrap each pop in a clear cellophane bag tied with green ribbon. For a truly festive setup, place them in small flower pots filled with edible grass made from shredded coconut tinted green.
 Save to Pinterest
 These Pot of Gold Cake Pops are more than just a festive dessert—they're an experience. From the moment you start crumbling that chocolate cake to the final sprinkle of edible gold, every step is filled with creative joy. Whether you're making them for a large St. Patrick's Day party, a classroom celebration, or simply to bring a smile to your family's faces, these whimsical treats deliver happiness in every bite. The combination of rich chocolate, smooth candy coating, and sparkling gold creates a sensory experience that's as delightful to look at as it is to taste. Store them in an airtight container at room temperature for up to three days, though they're so irresistible they rarely last that long. So gather your ingredients, put on some Irish music, and get ready to create some magic—your own little pots of gold that don't require a rainbow to find.
Questions & Answers
- → How do I shape the pops to resemble pots?
After mixing the cake crumb and frosting, roll into balls slightly flattened on top to mimic a pot's shape before chilling.
- → What’s the best way to attach the sticks securely?
Dip the tip of each stick into melted candy before inserting halfway into the cake balls, then chill to set firmly.
- → Can I customize the decorations?
Yes, use gold sprinkles for coins and optionally add green fondant or sprinkles for shamrock details.
- → How long should the cake pops chill before decorating?
Refrigerate the cake balls for about 30 minutes prior to coating and decorate before the coating fully sets.
- → Are there tips for storing the pops?
Store in an airtight container at room temperature for up to three days to maintain freshness.
- → Can these be made gluten-free?
Yes, use a gluten-free cake mix and confirm all decorations are gluten-free to accommodate dietary needs.