 Save to Pinterest
 My grandmother's kitchen always smelled like boiling pelmeni on Sunday afternoons, that particular steaminess that comes from a pot of salted water bubbling away while she stood at the counter, her hands moving with practiced rhythm. The first time she let me help, I was too impatient, folding them carelessly until she gently took my wrist and showed me how to pinch the corners just so, forming that distinctive little purse shape. Now whenever I make them, I'm back at that worn wooden table, the radio playing softly in the background, waiting for that moment when the dumplings float to the surface.
I learned to love pelmeni properly when I made them for my roommate during a particularly brutal winter storm—we were snowed in, and I realized we had flour, eggs, and ground meat in the freezer. Two hours later, we were sitting on the kitchen floor eating them straight from the pot, and something about that chaos and spontaneity made them taste better than any fancy dinner I'd ever cooked. That's when pelmeni stopped being just a recipe and became proof that the best meals happen when you're not trying too hard.
Ingredients
- All-purpose flour: Use a good quality flour if you can—it matters more than you'd think for achieving that silky dough that doesn't tear when you fill it.
- Cold water: This keeps the dough tender and workable; if your kitchen is warm, you might even use ice water.
- Large egg: Acts as a binder and gives the dough its structure; don't skip it or substitute.
- Ground pork and beef: The combination creates a flavor that's more interesting than either alone; if you only have one, use 14 oz of it instead.
- Finely grated onion: Grate it by hand if you can—the microplane gives you finer texture than a food processor, and it distributes moisture evenly through the filling.
- Garlic: Fresh is essential here; it brings life to the filling that dried garlic simply can't match.
- Salt and black pepper: Taste the filling raw before cooking (a tiny amount won't hurt you) to make sure the seasoning is right.
- Sour cream: Full-fat sour cream is worth seeking out; it makes a difference in texture and richness.
- Fresh dill: Optional, but if you have it, sprinkle it on top—it's a small thing that hints at the effort you put in.
Tired of Takeout? 🥡
Get 10 meals you can make faster than delivery arrives. Seriously.
One email. No spam. Unsubscribe anytime.
Instructions
- Build your dough foundation:
- Combine flour and salt in a large bowl, then create a well in the center for the egg. Mix slowly, adding cold water a little at a time, until the dough comes together. Knead for 8 to 10 minutes—your hands will tell you when it's ready, when it shifts from shaggy to smooth and bounces back when you press it. Cover and let it rest for 20 minutes while you prepare everything else; this resting time is when the gluten relaxes and the dough becomes easier to work with.
- Combine the filling:
- In a medium bowl, mix the ground pork and beef with the grated onion, garlic, salt, pepper, and cold water until everything is sticky and well incorporated. The cold water is the secret—it keeps the filling moist and tender when cooked. Taste a tiny pinch to check the seasoning and adjust as needed.
- Roll and cut the dough:
- Lightly flour your work surface and roll the dough very thin, about 1/16 inch thick—this is important because too-thick dough makes pelmeni that feel heavy rather than delicate. Cut circles with a 2.5-inch round cutter, re-rolling scraps as you go.
- Fill and fold with intention:
- Place 1 teaspoon of filling in the center of each circle, then fold it in half and pinch the curved edge firmly to seal. Now bring the two corners of the half-moon together and pinch them to seal, creating the classic little pelmeni purse. Work methodically—rushing this step means filling leaks out during cooking.
- Cook until they float:
- Bring a large pot of salted water to a rolling boil, then carefully drop pelmeni in batches, stirring gently so they don't stick to the bottom. Cook for 5 to 7 minutes after they float to the surface, which tells you the dough is cooked and the filling is hot all the way through. If you're cooking from frozen, add about 2 minutes to the cooking time.
- Finish with warmth and richness:
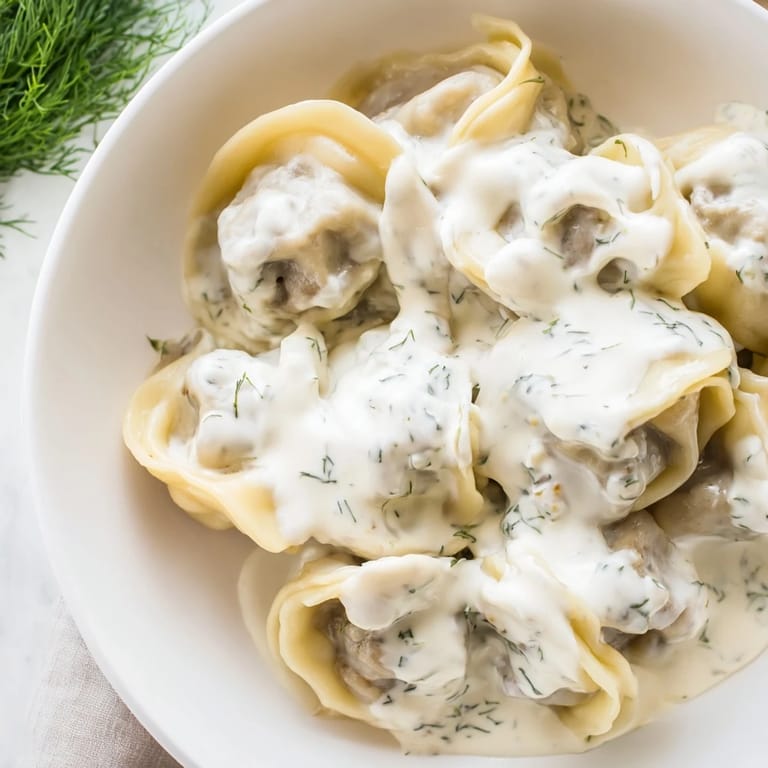
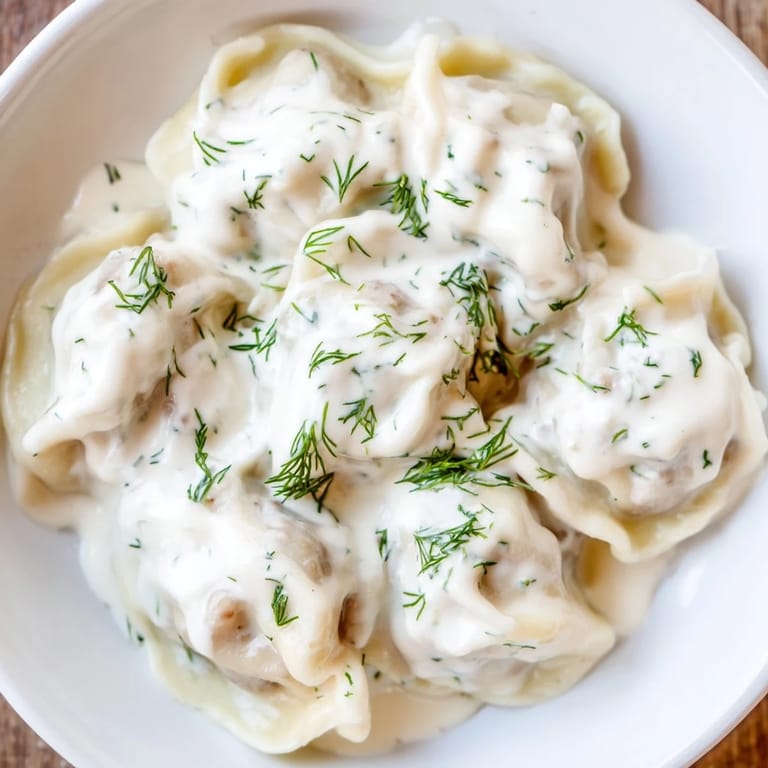
- Remove the cooked pelmeni with a slotted spoon directly into serving bowls. Top generously with cold sour cream and fresh dill, which creates a beautiful contrast of temperatures and textures.
 Save to Pinterest
 There's a moment when you pull the first batch from the boiling water and they sit in that bowl, steam rising, the sour cream beginning to melt into warm clouds—that moment is when you understand why this humble dumpling has survived centuries in Russian kitchens. It's not fancy, but it's complete.
Freezing and Make-Ahead Strategy
One of the great gifts pelmeni give you is the ability to make them in bulk and have them waiting in your freezer. Arrange them on a baking sheet without touching, freeze for a few hours until solid, then transfer to a freezer bag where they'll keep for up to three months. There's something deeply satisfying about pulling out a handful on a weeknight when you need dinner to happen quickly, knowing you're about to eat something you made with your own hands weeks ago.
Serving Suggestions and Pairings
While sour cream is the classic topping and honestly all you need, pelmeni are flexible enough to play well with other flavors. Some people drizzle melted butter over them, others add a splash of vinegar for brightness, and a few adventurous souls serve them in a simple broth. I've found that a small bowl of extra sour cream on the side lets everyone adjust to their taste, which somehow makes the meal feel more generous.
Troubleshooting and Fine Tuning
If your dough keeps tearing as you fill it, it's too dry—add another splash of water and knead briefly. If the filling is leaking out during cooking, your seals aren't tight enough; take your time pinching the edges, and don't overfill. If the pelmeni stick together in the pot, it usually means you didn't stir them enough right after they hit the water, or the water wasn't salty enough to create enough friction between them.
- Nutmeg is a secret ingredient that some recipes whisper about—add just a pinch to the filling if you want a subtle depth that makes people ask what's different.
- If you're short on time, you can skip the 20-minute rest and roll the dough right away, though the resting time genuinely does make it easier to work with.
- The filling actually improves if you let it sit in the refrigerator for an hour before filling, as the flavors meld together more completely.
 Save to Pinterest
 Pelmeni remind me that sometimes the dishes worth remembering aren't the complicated ones, but the ones that gather people around a table with warmth and simplicity. Make them when you want to feel connected to something older than yourself.
Questions & Answers
- → What type of meat is used for the filling?
A mix of ground pork and ground beef provides the savory filling, combined with onion and garlic for depth of flavor.
- → How thin should the dough be rolled out?
Roll the dough to about 1/16 inch (2 mm) thickness for a delicate yet sturdy wrapper around the filling.
- → How are pelmeni cooked properly?
Boil the dumplings in salted water until they float, usually about 5-7 minutes, ensuring the filling is fully cooked.
- → What is the traditional sauce served with pelmeni?
Pelmeni are traditionally served with a rich sour cream sauce, often garnished with fresh dill for added freshness.
- → Can pelmeni be prepared in advance?
Yes, pelmeni can be frozen before cooking; freeze them on a tray first, then transfer to a sealed bag for up to 3 months.